Saturday 31 October 2015

3ds max tutorial - How to create snow using snow particles

HOW TO CREATE A SNOWFALL USING SNOW PARTICLES ?


Hy friends,

Today i would like to you present a simple way for generate a snowfall from snow particles system.Snow particles system is similar to spray but now has additional control of render.This particles system often use in different types of games and animation simply.Now, we learn snowfall step by step.


NOTE : Viewport count, Flake size, Speed and variation setting  may be different as per scene. It is also depend on Distance between Object and Camera or Ground or etc.

FOLLOW THIS STEP FOR SNOWFALL
  • First, From create panel drop-down list select PARTICLES SYSTEM and click on SNOW from different types of particles system and Drag in to view port and must give its Arrow direction to ward bottom side for falling of particles to bottom side.In modify panel change its settings as per image below.


Now, particles system work finish and we go for its material for looking real snowfall. (Setting as per below image )


We change diffuse and ambient color white because real snowfall also looking approx white and specular level and its glossiness amount change to 0 (zero). Go to Extended parameters click on FALLOFF OUT because our snowfall properties is fade out from center to outside and its type change to FILTER.

Give GRADIENT map to OPACITY MAP for fade color position from white to grey and also instant  copy to self illumination and change illumination color to light grey. (As per above image )


Click on TEXTURE

Change color #1, #2 and #3 to Black, Light gray and White and Change setting of Gradient type to RADIAL.

Render the scene and enjoy animation of  like real snow fall.

KEEP LEARNING WITH US.


Thursday 29 October 2015

3ds max tutorial | How to create neon light with using glow effect |

3DS MAX TUTORIAL - NEON LIGHT USING GLOW EFFECT

Hy friends,

Today we will discuss here about how to create a Neon light. Neon light may be produce from text, object etc.But we will learn here that create a Neon light from a render able Spline.


CREATE A SPLINE

  • Go to command panel >> Shapes >> Text


  • Change the Text setting for suitable our view and give it  name MAX from basic parameters.

ASSIGN THE MATERIAL :


  • Hit M for call up the material editor or click on MENUBAR >> RENDERING >> MATERIAL EDITOR.

  • Give the material name MAX (For easily identify  material for  different material slot. )

  • Give the material ID 1.

  • Set the diffuse color Red and also give Red color to self illumination.

  • Assign the material to Text.

APPLY GLOW EFFECT :


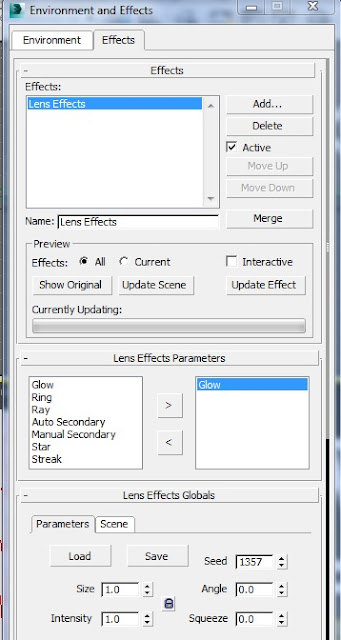
  • Go to MENUBAR >>RENDERING >> EFFECTS
Click on ADD and select LENS effect. 


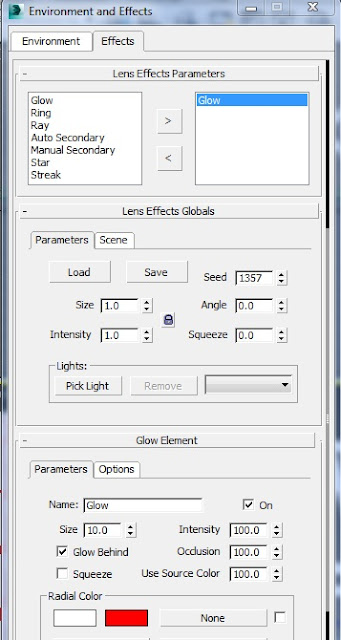
  • Click  on  Lens   effect  parameters  and select GLOW from left side list of effect.


In the Lens effect global rollout set the  size and intensity value to 1. In the Glow element Roll out.set the size to 8 - 10 and intensity  set to 80-100 and click on GLOW BEHIND OBJECT. (For makes the Glow visible behind the object. )


Now hit F9 for quick render for only test. We see that effect of our object only display here as per give material and there is no any glow display. For Display the Glow, follow this step below.

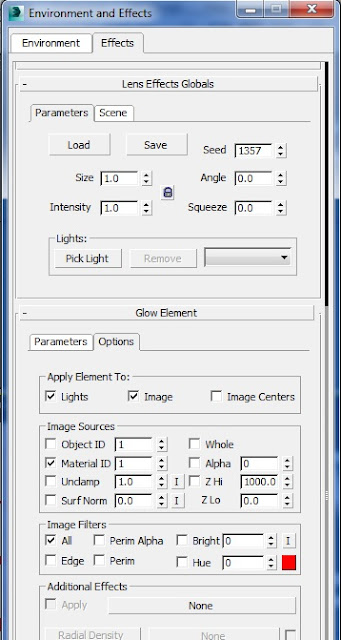
Click on option panel from GLOW ELEMENT and click  and enable MATERIAL ID and set to 1. (Set must to 1 because we also set material id to 1 in material editor. So it is necessary for Glow effect that Object material ID and Glow material ID must be same. ) Hit F9 again for quick render and see that our object glowing white color but our material has RED color. For glowing material color follow the step below again.

  • Fot the get material color fully visible here as glow lights, Set the value 100 of USE SOURCE COLOR.
Hit F9 and now we get finally Red glow behind the text 'MAX'

  • Now before final render open the option panel and set material ID to 1. (For glow text with source material color. )


Sunday 25 October 2015

3ds max tutorial - How can i change Environment or Background


LEARN HOW TO CHANGE DEFAULT ENVIRONMENT TO ANY BITMAP IMAGE ?


Today we learn that how to change background in 3ds max scene. Some time we require such types of background image like Landscaping, Sea, Mountain, clear blue or cloudy sky. We know that Pop up box display automatically when we put a Daylight or sun light in scene. for mr. physical sky in Daylight and Vray sky in vray sun. But sometime we need sunlight but we don't require its default sky because sometime designer face the problem of real, different and suitable environment for his scene. Here 3ds max also give us facility of change environment as we want.

First, we put a sunlight. After it, Vray immediately asking us for use Default Vray sky. (See below image .)


After click on 'YES' you can see default Vray sky map in Environment map.

Go to RENDERING >> ENVIRONMENT


Test Render by hit 'F9'

DEFAULT SKY

Now you can see Default Vray sky. You can not changes in it. If you want cloudy background or clear sky you can't. You must change Environment map. (See below image .)
  • Drag Environment map into an empty slot of material editor. I drag the background in material editor because i have no chance of change the setting like tiling, offset, angle etc. in Environment box but in Material editor i get this type of setting easily.


  • Change the tiling and mapping setting as per requirement. Render again  for test.
RENDER SCENE.


 After change the setting, i feel that now my teapot is pretty good. 

KEEP LEARNING WITH US. :)

Sunday 11 October 2015

3ds max tutorial -How can i make a realistic glass using vray material

HOW TO CREATE GLASS USING VRAY PLUGINS IN 3D STUDIO MAX ?


A realistic glass is one of the most important parts of creating a realistic rendering scene because it sets the time and mood of picture that you are trying to create.When we are going for architectural rendering there is nothing without real glass.I hope after this tutorial any one create easily a real glass using vray plugins in 3d studio max software.


In this tutorial you will learn how to play with material and how to use reflection and refraction slot. O.K. Now see how to create a real glass using reflection and refraction slot. I used here vray advance 2.40 and 3ds max 2014 version.

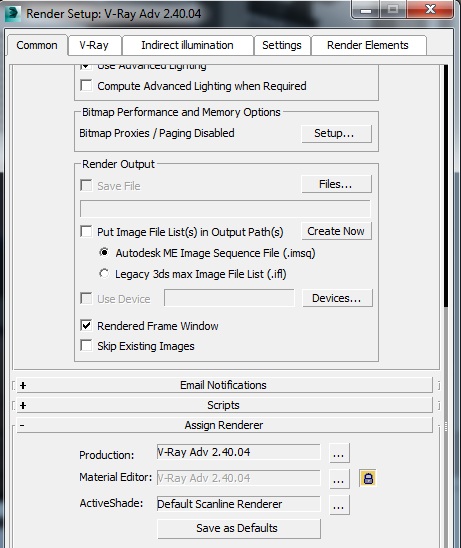
First we change our assign renderer setting default is scanline rendering we change it to vray for active vray plugins. This process is most important for effect of vray light and vray material.(See below image )


  • After change above setting. Hit 'M' key for call up MATERIAL EDITOR.Choose any empty slot and give it name as you wish for identify slot anytime.(Glass or etc.)
  • Go to Basic parameters
  • In REFLECTION slot change color black to sky blue (R-97, G-167, B-220 ). Here we change black to sky blue color for natural sky color glass.If we change this color in Diffuse tab, we see only black color or black reflection. Reflection tab can reflect more and reflect with sky blue color (which you can see in screen shot ).


 in REFRACTION slot Same as now we go for transparency of glass. Same as reflection process we change color here black to light grey.  (R-131, G-131, B-131 ).

Here we should know the power of white color because we increase the white color value. Object get more transparency. Refraction color 100% white means object has 100% transparency and fully transparent.This white color rules also use in reflection tab same as refraction.

KEEP LEARNING WITH US :)