Sunday 27 December 2015

3d studio max tutorial - How to create a Table lamp glow using VRaylightMtl in vray


Hi friends,


Today we discuss about Table lamp glow in vray plugins which is most important part in interior rendering and many designer suffer from actual glow from light.


First of all, We should know the property of a table lamp like its intensity, shadow, color and also its shining on wall. O.K.Now we start. I ignore objects modeling discuss here and we direct jump into Vray plug ins.
  • Change ASSIGN RENDER to V-Ray as production render.
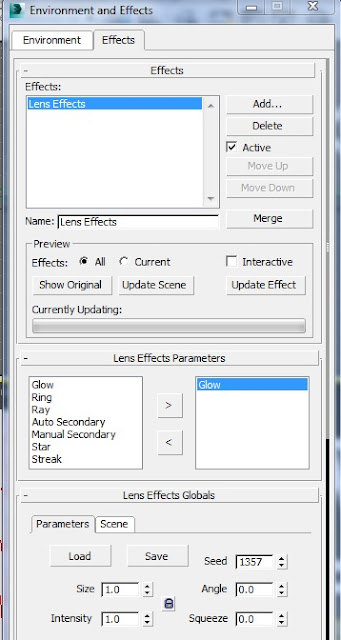
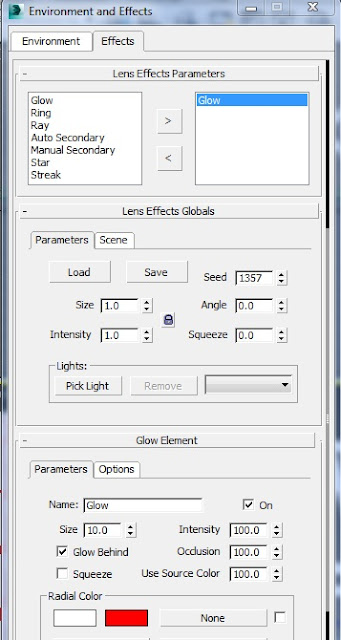
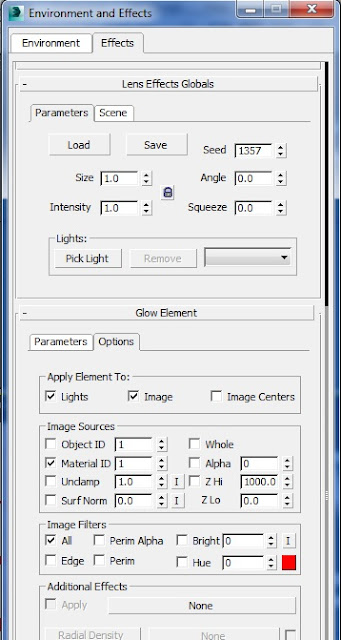
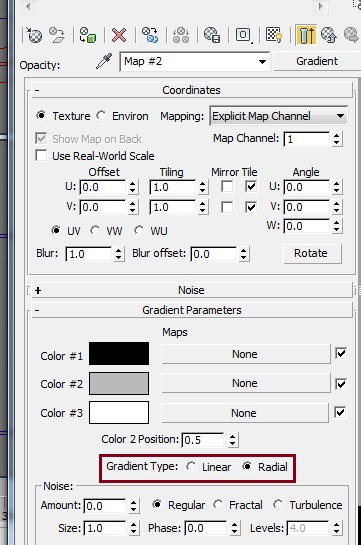
Now hit 'M' for open the Material editor and select an empty slot and give it VRaylightMtl from the material list and change the settings as per below image.


We can aslo change the parameters of this material as per requirement like change the color of glow and its intensity. Now click on RENDER for try draft render. ( Render image below )


O.K.  After i change the color and intensity multiplier my table lamp can glowing well but one thing is not here and missing which is the light shining on wall. Which is most important like a real world.For light shining on wall i would like to place a photo metric free light between the table lamp cylinder as per image. 


( NOTE : Shining direction on wall change due to Camera view and placing of  free light )


SETTINGS OF FREE PHOTO METRIC LIGHT :


HIT ' F9 ' for draft rendering.

INTENSITY 1.5

O.K. this is nice but shining of light on wall is less then glow source so, i change and increase the intensity of light 1.5 to 4.0 and click on render

INTENSITY 4.0

Illumination of light look pretty good on wall and table lamp also glowing well.


Sunday 15 November 2015

HOW TO CREATE VOLUME LIGHT EFFECT - 3ds studio max tutorial

TUTORIAL - VOLUME LIGHT EFFECT 


In some scene we see that light comes through a window in dark room and shining the lights beam. ( Through smoke, dust etc. and make its shine visible. ) It is also use for Table lamp's beam, Car head light beam etc.

CREATE A TARGET LIGHT -
First of all, We must create a Target light which light beam is coming from window ( as per below image ) and in SHADOW SECTION click shadow ON and select SHADOW MAP from drop down shadow list. Multiplier as per scene and color also.


CREATE A VOLUME LIGHT -
For, Create and add a volume light in scene, Click on RENDERING from Menubar and select ENVIRONMENT click on ATMOSPHERE and click on ADD and select VOLUME LIGHT form effect list. Select volume light from EFFECT box. In volume light parameters click on PICK LIGHT and select light which is comes through room window and we will use as volume light. ( In this tutorial i select a Target light of course this light direction is coming from window.) We can also remove light which we selected.

VOLUME LIGHT PARAMETERS -


In the Volume section, There is two color appear FOG COLOR and ATTENUATION COLOR. Fog color is always combined with light color and Attenuation color set to dark.The DENSITY value means density of fog or light visible.The EXPONENTIAL option causes the density to increase exponentially with the distances. MAX. and MIN. LIGHT % is decide that how much percentage glow appear with the distances. ATTENUATION MULTIPLIER determine the control of the strength of attenuation color with the distances. 

FILTER OF SHADOW -
Filter of shadow decide the shadow sample for clear shadow.We have four option LOW, MID, HIGH and Light sample range. 

Low sample render very fast but not create accurate shadow.
High sample render slow but it create accurate shadow. 

Sample value can range 0 to 5,000 also. Low sample has 8, Mid sample has 25 and High sample has 50 value.

ATTENUATION -
Start and End Attenuation percentage are determine light range for the Attenuation value.

NOISE -
The Noise amount decide that how much noise coming with light.There is Four option for Noise type Regular, Fractal, Turbulence and Invert.Regular option create regular noise and Fractal or Turbulence option create noise like cloud.

WIND FROM THE -
This option determine that which side wind is coming from. Here please note that this option only effect when select NOISE on.

And other setting is Wind strength, Phase (for Animation) etc.

STAY TOUCH WITH US :)


Saturday 31 October 2015

3ds max tutorial - How to create snow using snow particles

HOW TO CREATE A SNOWFALL USING SNOW PARTICLES ?


Hy friends,

Today i would like to you present a simple way for generate a snowfall from snow particles system.Snow particles system is similar to spray but now has additional control of render.This particles system often use in different types of games and animation simply.Now, we learn snowfall step by step.


NOTE : Viewport count, Flake size, Speed and variation setting  may be different as per scene. It is also depend on Distance between Object and Camera or Ground or etc.

FOLLOW THIS STEP FOR SNOWFALL
  • First, From create panel drop-down list select PARTICLES SYSTEM and click on SNOW from different types of particles system and Drag in to view port and must give its Arrow direction to ward bottom side for falling of particles to bottom side.In modify panel change its settings as per image below.


Now, particles system work finish and we go for its material for looking real snowfall. (Setting as per below image )


We change diffuse and ambient color white because real snowfall also looking approx white and specular level and its glossiness amount change to 0 (zero). Go to Extended parameters click on FALLOFF OUT because our snowfall properties is fade out from center to outside and its type change to FILTER.

Give GRADIENT map to OPACITY MAP for fade color position from white to grey and also instant  copy to self illumination and change illumination color to light grey. (As per above image )


Click on TEXTURE

Change color #1, #2 and #3 to Black, Light gray and White and Change setting of Gradient type to RADIAL.

Render the scene and enjoy animation of  like real snow fall.

KEEP LEARNING WITH US.


Thursday 29 October 2015

3ds max tutorial | How to create neon light with using glow effect |

3DS MAX TUTORIAL - NEON LIGHT USING GLOW EFFECT

Hy friends,

Today we will discuss here about how to create a Neon light. Neon light may be produce from text, object etc.But we will learn here that create a Neon light from a render able Spline.


CREATE A SPLINE

  • Go to command panel >> Shapes >> Text


  • Change the Text setting for suitable our view and give it  name MAX from basic parameters.

ASSIGN THE MATERIAL :


  • Hit M for call up the material editor or click on MENUBAR >> RENDERING >> MATERIAL EDITOR.

  • Give the material name MAX (For easily identify  material for  different material slot. )

  • Give the material ID 1.

  • Set the diffuse color Red and also give Red color to self illumination.

  • Assign the material to Text.

APPLY GLOW EFFECT :


  • Go to MENUBAR >>RENDERING >> EFFECTS
Click on ADD and select LENS effect. 


  • Click  on  Lens   effect  parameters  and select GLOW from left side list of effect.


In the Lens effect global rollout set the  size and intensity value to 1. In the Glow element Roll out.set the size to 8 - 10 and intensity  set to 80-100 and click on GLOW BEHIND OBJECT. (For makes the Glow visible behind the object. )


Now hit F9 for quick render for only test. We see that effect of our object only display here as per give material and there is no any glow display. For Display the Glow, follow this step below.

Click on option panel from GLOW ELEMENT and click  and enable MATERIAL ID and set to 1. (Set must to 1 because we also set material id to 1 in material editor. So it is necessary for Glow effect that Object material ID and Glow material ID must be same. ) Hit F9 again for quick render and see that our object glowing white color but our material has RED color. For glowing material color follow the step below again.

  • Fot the get material color fully visible here as glow lights, Set the value 100 of USE SOURCE COLOR.
Hit F9 and now we get finally Red glow behind the text 'MAX'

  • Now before final render open the option panel and set material ID to 1. (For glow text with source material color. )


Sunday 25 October 2015

3ds max tutorial - How can i change Environment or Background


LEARN HOW TO CHANGE DEFAULT ENVIRONMENT TO ANY BITMAP IMAGE ?


Today we learn that how to change background in 3ds max scene. Some time we require such types of background image like Landscaping, Sea, Mountain, clear blue or cloudy sky. We know that Pop up box display automatically when we put a Daylight or sun light in scene. for mr. physical sky in Daylight and Vray sky in vray sun. But sometime we need sunlight but we don't require its default sky because sometime designer face the problem of real, different and suitable environment for his scene. Here 3ds max also give us facility of change environment as we want.

First, we put a sunlight. After it, Vray immediately asking us for use Default Vray sky. (See below image .)


After click on 'YES' you can see default Vray sky map in Environment map.

Go to RENDERING >> ENVIRONMENT


Test Render by hit 'F9'

DEFAULT SKY

Now you can see Default Vray sky. You can not changes in it. If you want cloudy background or clear sky you can't. You must change Environment map. (See below image .)
  • Drag Environment map into an empty slot of material editor. I drag the background in material editor because i have no chance of change the setting like tiling, offset, angle etc. in Environment box but in Material editor i get this type of setting easily.


  • Change the tiling and mapping setting as per requirement. Render again  for test.
RENDER SCENE.


 After change the setting, i feel that now my teapot is pretty good. 

KEEP LEARNING WITH US. :)

Sunday 11 October 2015

3ds max tutorial -How can i make a realistic glass using vray material

HOW TO CREATE GLASS USING VRAY PLUGINS IN 3D STUDIO MAX ?


A realistic glass is one of the most important parts of creating a realistic rendering scene because it sets the time and mood of picture that you are trying to create.When we are going for architectural rendering there is nothing without real glass.I hope after this tutorial any one create easily a real glass using vray plugins in 3d studio max software.


In this tutorial you will learn how to play with material and how to use reflection and refraction slot. O.K. Now see how to create a real glass using reflection and refraction slot. I used here vray advance 2.40 and 3ds max 2014 version.

First we change our assign renderer setting default is scanline rendering we change it to vray for active vray plugins. This process is most important for effect of vray light and vray material.(See below image )


  • After change above setting. Hit 'M' key for call up MATERIAL EDITOR.Choose any empty slot and give it name as you wish for identify slot anytime.(Glass or etc.)
  • Go to Basic parameters
  • In REFLECTION slot change color black to sky blue (R-97, G-167, B-220 ). Here we change black to sky blue color for natural sky color glass.If we change this color in Diffuse tab, we see only black color or black reflection. Reflection tab can reflect more and reflect with sky blue color (which you can see in screen shot ).


 in REFRACTION slot Same as now we go for transparency of glass. Same as reflection process we change color here black to light grey.  (R-131, G-131, B-131 ).

Here we should know the power of white color because we increase the white color value. Object get more transparency. Refraction color 100% white means object has 100% transparency and fully transparent.This white color rules also use in reflection tab same as refraction.

KEEP LEARNING WITH US :)


Wednesday 30 September 2015

3ds max tutorial | How to create stucco map as wall plaster


HOW TO CREATE STUCCO MATERIAL IN 3D STUDIO MAX ?

Hello friends,


Which map do you use in your architectural scene as plaster wall in 3ds max ? Bump, Dirt, Mix map ? 

O.K. Today we discuss about stucco map and learn how to create and use stucco map in architectural model as cement plaster wall or texture etc. Stucco map generally very useful in architectural scene as decorative wall, ceilings or ancient construction.It is very pretty and big variation between diffuse and Stucco map.Stucco map gives finishing and smooth effect to object and give choice for different colors which looks like real world.

RENDER IMAGE WITH STUCCO MAP


SKILL : BEGINNER

We start here from basic modelling for our scene and create plane for base and a torus knot from 
Command panel >> extended primitives >>Torus knot. 


RENDER WITHOUT STUCCO MAP


Now,
  • Hit 'M' for open the material editor or go to 
       MENUBAR > RENDERING > MATERIAL EDITOR.
  • Select an empty slot and give name 'STUCCO' for easily identify.


  • Click on Maps you will see there is different types of map i select DIFFUSE and click of NONE and select STUCCO as sub map from map list.


  • Drag STUCCO sub map into BUMP map ( As per below image ) you see pop up box for copy instance method. Now select INSTANCE method from list. (After select this method if you change any parameters for this map in diffuse map you will see changes automatically in BUMP map for great result.)

                                            
  • Change the bump map value for bump effect to object. Here i use 450 value for bump map.( Increase the value get bump map more sharp.)


  • I used color here

COLOR #1  = 183,183,183 (RGB VALUE)
COLOR #2  = 206,206,206 (RGB VALUE)

Here, we should know about the parameters of stucco map for controlling it. 

SIZE
Size value change the stucco size. It is always regarding the object size and distance from camera.
                  

THICKNESS -
Thickness also like increase bump value. We should know Remember that increase   the amount of bump may be give bad result of RENDER. So, i use 0.15 thickness here.

THRESHOLD
See below image for compare different value of Threshold.
                  
ENJOY TUTORIAL


Monday 7 September 2015

3ds max super spray particle tutorial- How can i create a realistic smoke.


HOW TO CREATE SMOKE USING PARTICLE SYSTEM IN 3D STUDIO MAX ?


Hy friends.


Smoke is very important in Animation and Specially for Game.Today i show you that how to create realistic smoke using super spray particle.This tutorial is not difficult but it is necessary that you should know all the basic parameters of 3d studio max.


RENDER IMAGE


MODELING :


First, we create some model for this scene like ash tray, cigarette etc.For create ash tray i used lathe modifier (check my old tutorial for how can make a model from lathe modifier). For cigarette i used a cylinder and rotate its position as per above image. How can you assign it texture and map, i will learn you in my tutorial of texture.) Now, my modeling is complete.


SUPER SPRAY ( SMOKE )  :

Go to COMMAND PANEL and select GEOMETRY. In drop down menu select PARTICLE SYSTEM and select SUPER SPRAY 
  • Put it at tip of cigarette as per above image.(Because smoke is always generate from tip of cigarette ). Remember that the arrow of super spray must be up side for direction of smoke up side.
  • Select super spray and go to modify for change its parameters as per below.


DRAG FORCE :


DRAG is the force object and it is simulate wind resistance and reduce the particle moving speed like as real world.
  • Go to COMMAND PANEL and select SPACE WARPS. In drop down menu select DRAG and keep it near super spray particle. ( Remember that there is no change effect in case drag force is near or far from super spray particle.) 
  • Change the Drag force setting as per below image.


WIND FORCE :


Wind force is very similar like real world wind we only change its strength and other parameter.
  • Go to COMMAND PANEL and select SPACE WARPS. In drop down menu select WIND and keep its arrow opposite side of cigarette.Where you put wind force it is depend on which side we want to generate wind. ( Remember that this force situation effect the smoke direction. Change it and play for appropriate wind direction.) 
  • Change the WIND force PARAMETERS as per below image.


BIND SPACE WARPS TO SUPER SPRAY PARTICLE
Now we have to BIND THE DRAG AND WIND FORCE TO SUPER SPRAY  for effect the forces of Drag and Wind to super spray.
For bind the force to super spray go to STATUS BAR and click on the button highlighted below.


After select it drag the mouse from DRAG FORCE to SUPER SPRAY particle. Remember that when this binding process complete successfully highlight the binding object for a moment and drag force also can see in modify panel of super spray. (See below image )


MATERIAL APPLY

Now, This is the time for applying the material for change the simple particle effect to realistic smoke effect of SUPER SPRAY.

For open the material editor

MENU BAR >RENDERING>MATERIAL EDITOR<COMPACT MATERIAL EDITOR

OR


HIT 'M' FOR OPEN MATERIAL EDITOR DIRECTLY FOR COMMAND and Select an empty slot give it changes as per below image.


In OPACITY map apply a map = GRADIENT MAP and change its setting as per below image.


NOTE : You can also change the color this map for set the smoke color.
Assign this material to
SUPER SPRAY and RENDER ( F9 ) the image.

KEEP LEARNING WITH US :)