Wednesday 30 September 2015

3ds max tutorial | How to create stucco map as wall plaster


HOW TO CREATE STUCCO MATERIAL IN 3D STUDIO MAX ?

Hello friends,


Which map do you use in your architectural scene as plaster wall in 3ds max ? Bump, Dirt, Mix map ? 

O.K. Today we discuss about stucco map and learn how to create and use stucco map in architectural model as cement plaster wall or texture etc. Stucco map generally very useful in architectural scene as decorative wall, ceilings or ancient construction.It is very pretty and big variation between diffuse and Stucco map.Stucco map gives finishing and smooth effect to object and give choice for different colors which looks like real world.

RENDER IMAGE WITH STUCCO MAP


SKILL : BEGINNER

We start here from basic modelling for our scene and create plane for base and a torus knot from 
Command panel >> extended primitives >>Torus knot. 


RENDER WITHOUT STUCCO MAP


Now,
  • Hit 'M' for open the material editor or go to 
       MENUBAR > RENDERING > MATERIAL EDITOR.
  • Select an empty slot and give name 'STUCCO' for easily identify.


  • Click on Maps you will see there is different types of map i select DIFFUSE and click of NONE and select STUCCO as sub map from map list.


  • Drag STUCCO sub map into BUMP map ( As per below image ) you see pop up box for copy instance method. Now select INSTANCE method from list. (After select this method if you change any parameters for this map in diffuse map you will see changes automatically in BUMP map for great result.)

                                            
  • Change the bump map value for bump effect to object. Here i use 450 value for bump map.( Increase the value get bump map more sharp.)


  • I used color here

COLOR #1  = 183,183,183 (RGB VALUE)
COLOR #2  = 206,206,206 (RGB VALUE)

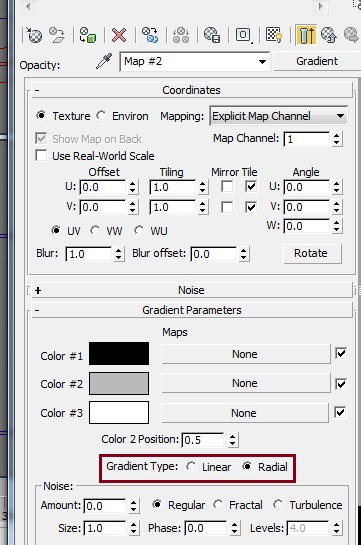
Here, we should know about the parameters of stucco map for controlling it. 

SIZE
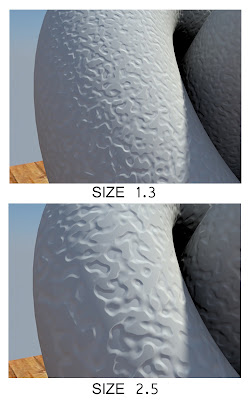
Size value change the stucco size. It is always regarding the object size and distance from camera.
                  

THICKNESS -
Thickness also like increase bump value. We should know Remember that increase   the amount of bump may be give bad result of RENDER. So, i use 0.15 thickness here.

THRESHOLD
See below image for compare different value of Threshold.
                  
ENJOY TUTORIAL


Monday 7 September 2015

3ds max super spray particle tutorial- How can i create a realistic smoke.


HOW TO CREATE SMOKE USING PARTICLE SYSTEM IN 3D STUDIO MAX ?


Hy friends.


Smoke is very important in Animation and Specially for Game.Today i show you that how to create realistic smoke using super spray particle.This tutorial is not difficult but it is necessary that you should know all the basic parameters of 3d studio max.


RENDER IMAGE


MODELING :


First, we create some model for this scene like ash tray, cigarette etc.For create ash tray i used lathe modifier (check my old tutorial for how can make a model from lathe modifier). For cigarette i used a cylinder and rotate its position as per above image. How can you assign it texture and map, i will learn you in my tutorial of texture.) Now, my modeling is complete.


SUPER SPRAY ( SMOKE )  :

Go to COMMAND PANEL and select GEOMETRY. In drop down menu select PARTICLE SYSTEM and select SUPER SPRAY 
  • Put it at tip of cigarette as per above image.(Because smoke is always generate from tip of cigarette ). Remember that the arrow of super spray must be up side for direction of smoke up side.
  • Select super spray and go to modify for change its parameters as per below.


DRAG FORCE :


DRAG is the force object and it is simulate wind resistance and reduce the particle moving speed like as real world.
  • Go to COMMAND PANEL and select SPACE WARPS. In drop down menu select DRAG and keep it near super spray particle. ( Remember that there is no change effect in case drag force is near or far from super spray particle.) 
  • Change the Drag force setting as per below image.


WIND FORCE :


Wind force is very similar like real world wind we only change its strength and other parameter.
  • Go to COMMAND PANEL and select SPACE WARPS. In drop down menu select WIND and keep its arrow opposite side of cigarette.Where you put wind force it is depend on which side we want to generate wind. ( Remember that this force situation effect the smoke direction. Change it and play for appropriate wind direction.) 
  • Change the WIND force PARAMETERS as per below image.


BIND SPACE WARPS TO SUPER SPRAY PARTICLE
Now we have to BIND THE DRAG AND WIND FORCE TO SUPER SPRAY  for effect the forces of Drag and Wind to super spray.
For bind the force to super spray go to STATUS BAR and click on the button highlighted below.


After select it drag the mouse from DRAG FORCE to SUPER SPRAY particle. Remember that when this binding process complete successfully highlight the binding object for a moment and drag force also can see in modify panel of super spray. (See below image )


MATERIAL APPLY

Now, This is the time for applying the material for change the simple particle effect to realistic smoke effect of SUPER SPRAY.

For open the material editor

MENU BAR >RENDERING>MATERIAL EDITOR<COMPACT MATERIAL EDITOR

OR


HIT 'M' FOR OPEN MATERIAL EDITOR DIRECTLY FOR COMMAND and Select an empty slot give it changes as per below image.


In OPACITY map apply a map = GRADIENT MAP and change its setting as per below image.


NOTE : You can also change the color this map for set the smoke color.
Assign this material to
SUPER SPRAY and RENDER ( F9 ) the image.

KEEP LEARNING WITH US :)